Phasing out a legacy (Enterprise Content Management (ECM) system, e.g., Livelink, FileNet, OpenText, Documentum) and embracing a modern and more cost-efficient one is becoming urgent for enterprises nowadays, especially when remote work is necessary and more and more popular. Microsoft 365, with its powerful knowledge management, collaboration features, and intranet networking, is the leading supplier of software in the cloud (33% market share). But migrating to Microsoft 365 or SharePoint can be challenging, considering the differences between the original and the target systems. After doing migration projects of all sizes and complexities for many years, this is a short guide to help make your migration to SharePoint a fast and secure process.
1. Always analyze the content on the source system first
Just as moving is the best time to get rid of old, unwanted junk in your house, migrating to a new system is also the best opportunity to sort out your documents and data. You don't want to migrate junk or work with a new system that is as messed up as the old one. A suggestion for any migration: do a thorough analysis of all content on your source system first. We start with, Xillio Insights, our tool to create an in-depth report on everything content-related.
Using Xillio Insights to uncover the true value of your content
During this analysis, you should get information about your content as per the below:
The volume and format of your documents- File categories and extensions
- Content types, schemes or blueprints, and data models
- Duplicate files and folder structures
- Folder and file activity over time
- Metadata keywords and usage
This report allows you to define your migration strategy, for example, delete duplicates, archive outdated content, or abandon files with a certain extension. In this way, you will only move the content you need and want to your new system, and in good shape.
Next, check if an API or export functionality is available to export the selected data from your old system in an automated and structured way.
2. Determine the data structure in your new SharePoint system
After the analysis of the content in the source system(s), you can determine your data structure in SharePoint. SharePoint structures data from general to specific in web applications, site collections, sites and subsites, lists/libraries, and folders. The most common way to structure SharePoint data is by using several hierarchical trees of sites.
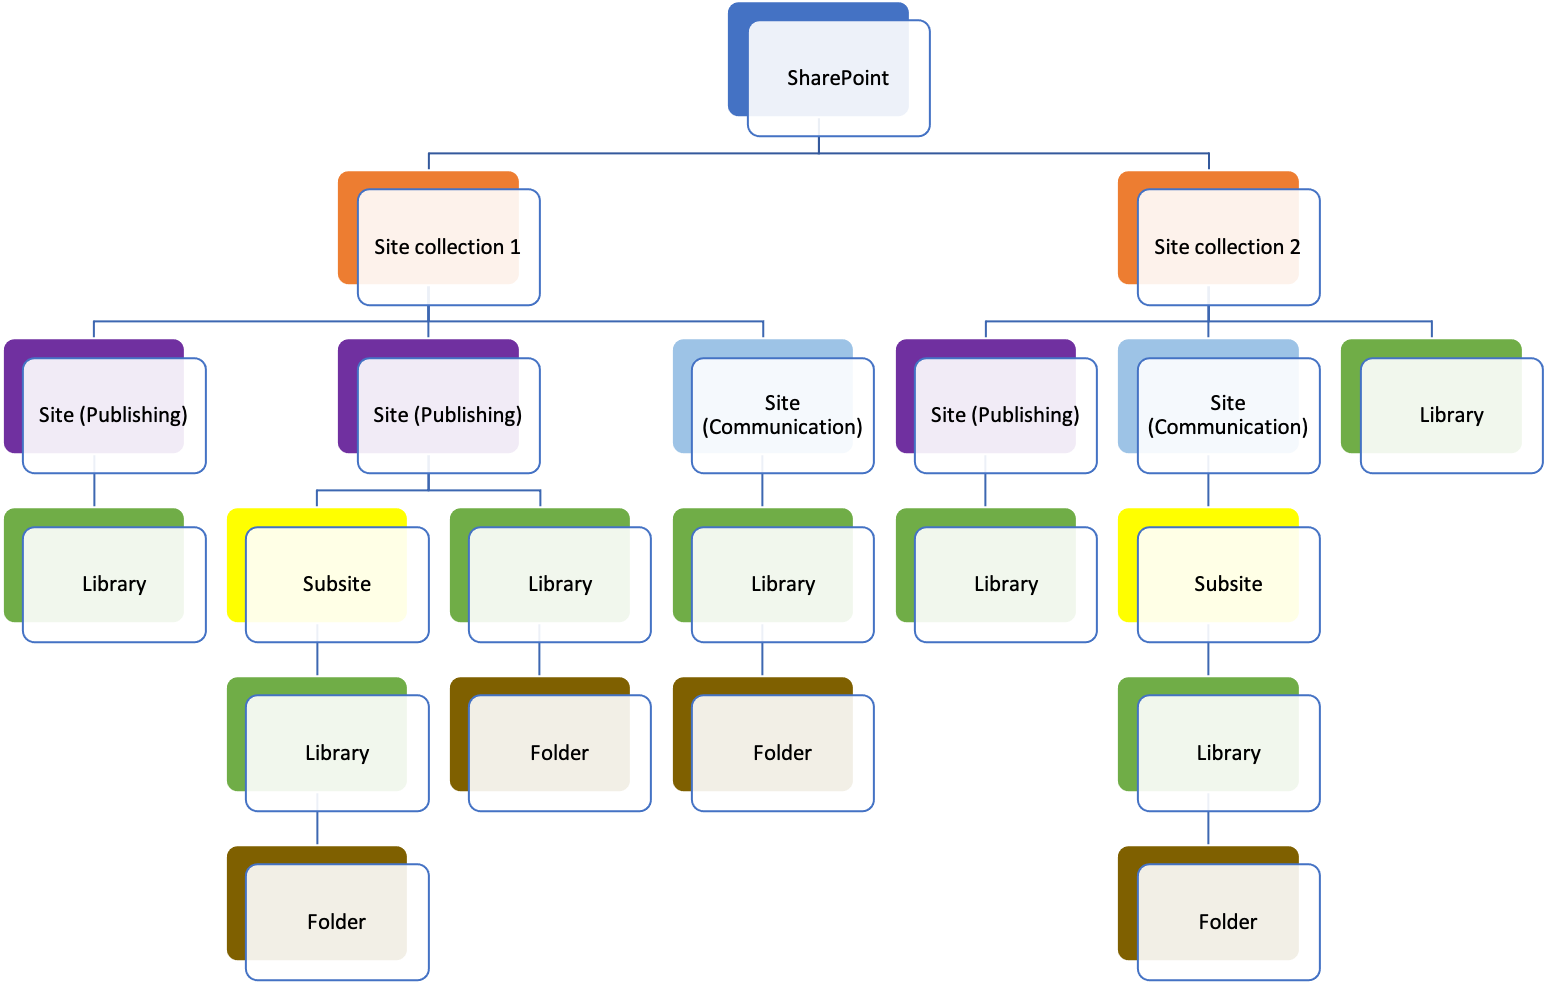
An example of a data structure in SharePoint
Each site in such a hierarchy has its configuration of content types, users, permissions, metadata fields, and other site settings. Sites at lower levels in the hierarchy can inherit and specialize the settings from sites positioned at higher levels. And you can change the permission by breaking the inheritance.
3. Define a global data model in SharePoint
It's time to define a new metadata model based on the decision you made in step 1. During this step, you can compare the data models of the source system with the target system and merge the data models into one global data model, so that all data can be covered. Having one global metadata model will improve the quality of your SharePoint content and findability.
You may consider governing your metadata by using two powerful features available in SharePoint Online:
- The Term Store: allowing you to organize terms and tags into a taxonomy (term hierarchy) with managed topics and keywords, and define governance (assign domain-specific management roles) to keep them up-to-date. These centrally managed terms can then be used in SharePoint content types, to manage acronym searches
- The Content-Type Gallery: this function allows you to build a central repository of content types (collections of metadata meant to describe types of files and documents) that can be used throughout your SharePoint site collections, thus standardizing the ways documents and files are described and found
As they are both functions global to the SharePoint platform, both can be found in the SharePoint Admin center, under Content Services.
4. Classify all content according to the new metadata model
If you wish to increase your content's findability, you need to apply metadata tags to classify your data. If you have a large amount of data, we recommend using tooling to automatically classify the content from your source system, e.g. by using the new Microsoft Syntex product.
5. Transfer your data into SharePoint
Now you have cleaned up your old house and have the cabinets and drawers to put your stuff in. It's time to move!
Using SharePoint import connector to transfer data from any system to SharePoint
In the most trivial of scenarios, you can transfer the data manually or using simple tools. But if you want to ensure that no data or metadata is lost during a migration, you should transfer in an automated way. Thus, you can put your content in the right place even if it concerns tens or hundreds of thousands, or even millions of items.
----------------------------------------------
Decided to migrate to SharePoint?
Download this free whitepaper, and learn all the challenges of SharePoint migration and the way to overcome them.
Share this

How to Make Your Migration Project a Success: A Step-by-Step Guide

Smart strategies to master content migration and avoid common pitfalls
.jpg?width=666&height=444&name=steps_before_migrating-file-shares%20(1).jpg)
No Comments Yet
Let us know what you think